Kitchen Sink Base Cabinet Reinforcement for Residential Countertops With Heavy Stone Materials
A stone countertop can look flawless on installation day and still fail at the sink. The slab is rarely the problem — the cabinet underneath it is. The sink base is the weakest cabinet in the kitchen: it carries the heaviest slab, the heaviest sink, and a full basin of water, yet it is built with a giant hole in the top. Reinforcing it before templating is straightforward and inexpensive; fixing it after a crack appears costs far more.
The Short Answer: What a Sink Base Needs Before Stone Goes On
A sink base is ready for heavy stone when three conditions are met: the cabinet is level, anchored to the wall, and stiff enough that the front rail does not flex when pressed; a plywood deck or solid rails bridge the sink cutout so the stone is supported on both sides; and the sink hangs from its own rails, cradle, or frame rather than from the stone or silicone alone. If any of the three is missing, the installation is borrowing trouble. A sink base gives up most of that closed-box structure for the basin and plumbing — reinforcement simply restores what the cutout took away.
Why the Sink Bay Carries the Worst Load in the Whole Kitchen
Four loads meet at the sink bay. First, the stone: a 3-centimetre granite or quartz slab weighs roughly 18 to 25 pounds per square foot, putting several hundred pounds on cabinets designed for a laminate top weighing a fraction of that. Second, the cutout removes stone exactly where the cabinet is weakest, leaving two narrow strips — front and back of the sink — to carry everything. Third, the sink itself: a fireclay farmhouse sink weighs 85 to 100 pounds empty, cast iron can exceed 100 pounds, and a deep basin of water at about 8.3 pounds per gallon plus pots can push the hanging load past 300 pounds on one bay. Fourth, a garbage disposal adds vibration, slowly working adhesive and screws loose. Failure is usually quiet: a hairline crack from a sink corner, or a seal that keeps pulling away.
Reading Your Sink Base Before You Touch a Screw
Different cabinets fail in different places, so diagnosis comes first. A sound plywood cabinet may need only a deck and a front-rail stiffener, while a particleboard cabinet with a swollen floor may need its base rebuilt first. Check with the doors off, before templating, since templating locks in measurements that assume a finished, level run.
- Front rail flex: Any movement means stiffening is needed.
- Water damage: Swollen particleboard holds no screws.
- Level and flush: A high corner becomes a stress point.
- Anchoring: A freestanding box can rack sideways.
If the floor is soft or sides are crumbling, replacing the sink base before stone goes on is the cheaper decision.
Stone Weights by the Square Foot: What Your Cabinet Is Actually Holding
A sample chip feels light, but across a full run the numbers are serious — and they explain why a cabinet that held laminate for twenty years can struggle under stone. Figures below are typical ranges for 3-centimetre material; thinner 2-centimetre slabs weigh roughly a third less but are less rigid, so support spacing matters more.
The takeaway is the jump: laminate to stone roughly quadruples the load.
The Front Rail Fix: Restoring the Beam the Cutout Took Away
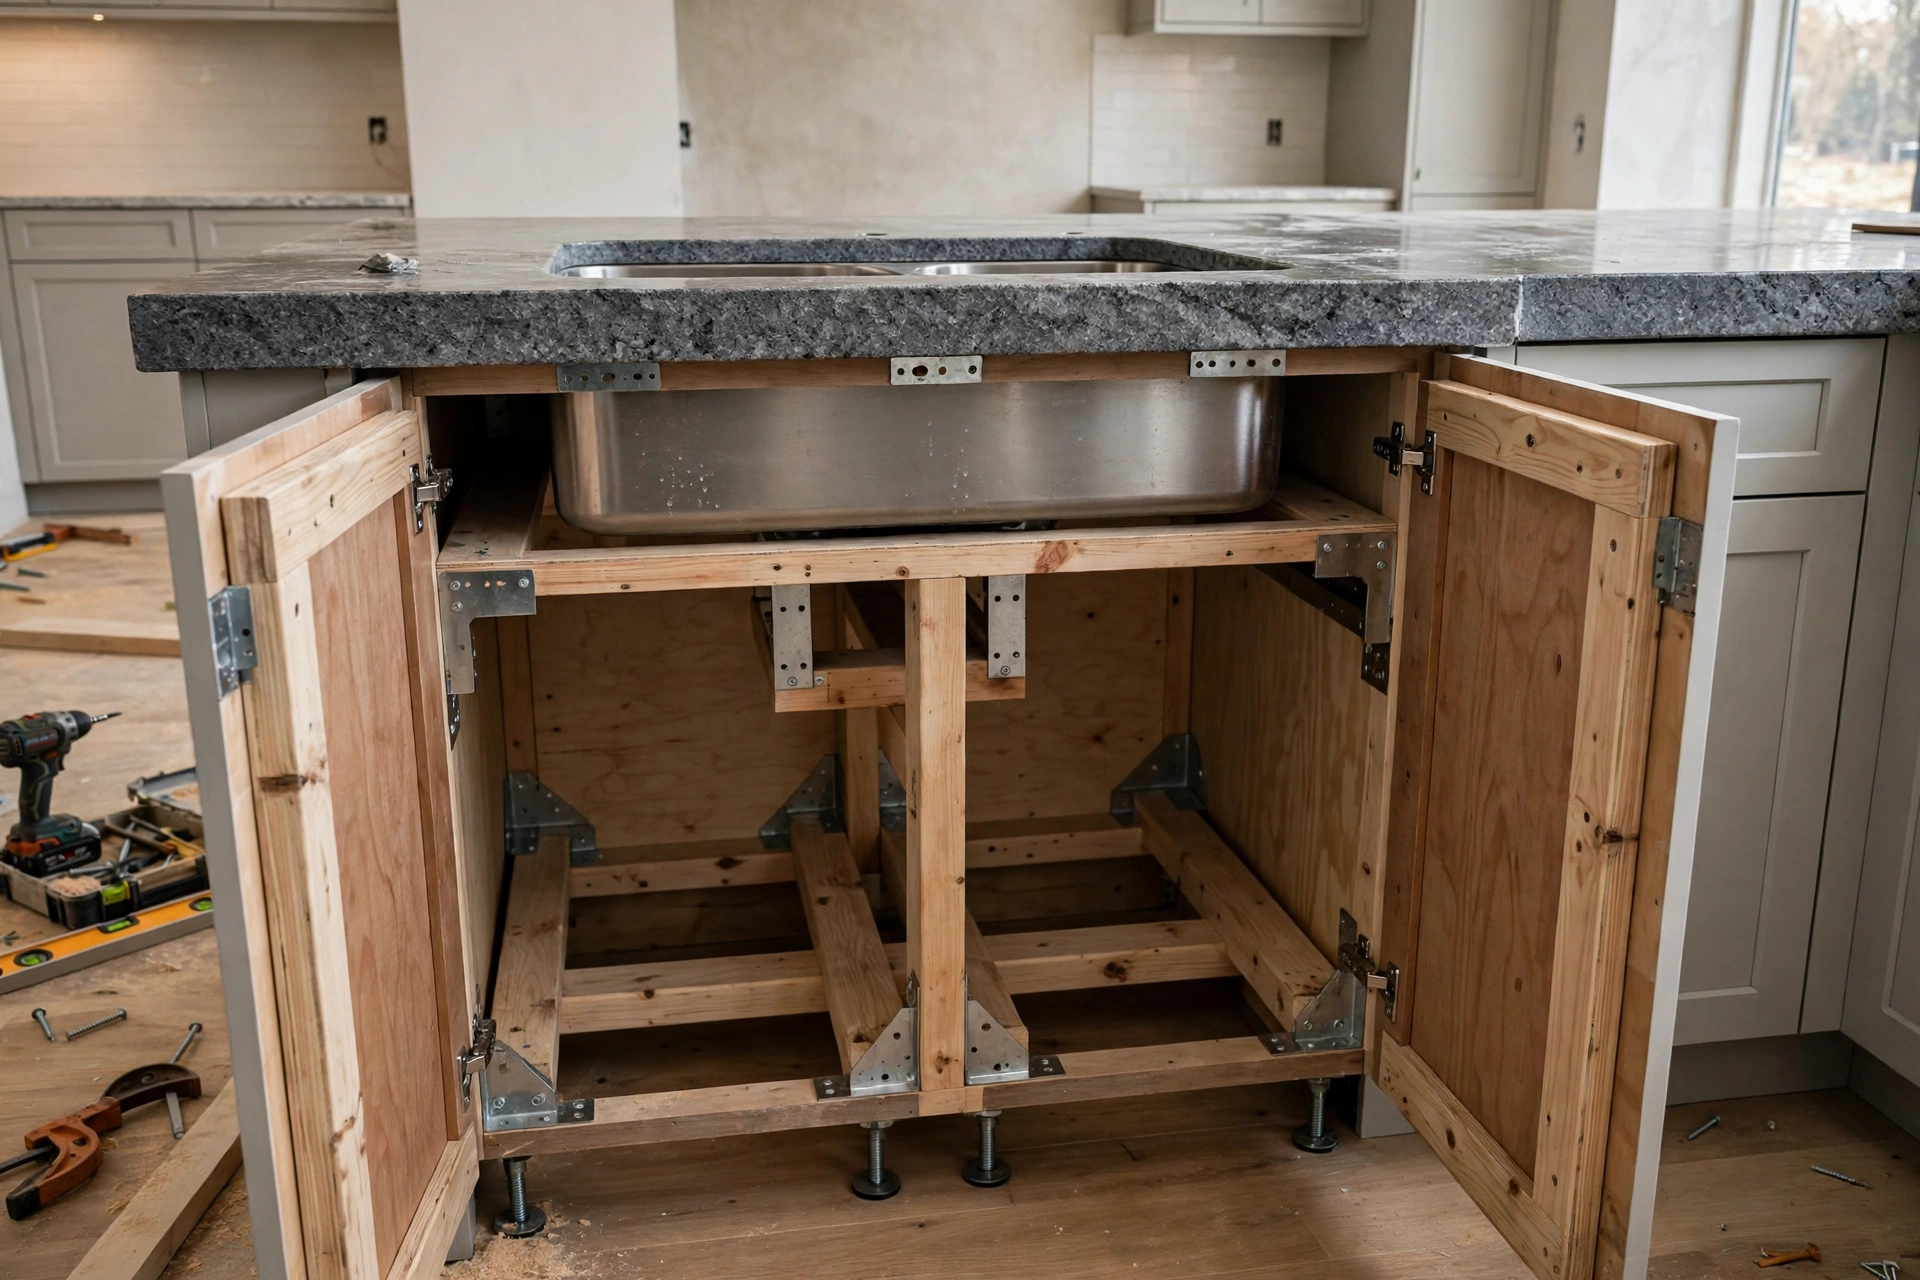
In a standard base cabinet, the front rail — the horizontal member across the top of the face frame — acts as a beam carrying the front edge of the countertop. In a sink base, that beam is interrupted or missing, and the front strip of stone spans a gap with little beneath it: the most common gap in sink base installations. The classic repair is steel angle iron, commonly 2 by 1-1/2 inches, screwed across the door opening beneath the front edge of the stone. Steel carries the strip without bulk and resists the slow sag wood develops under sustained load; a doubled hardwood or plywood rail achieves much of the same stiffness. Frameless cabinets need this most — the angle or ledger becomes the rail. Fasten into solid side material, flush with the tops, so the stone never bridges a gap.
Plywood Decking Across the Sink Bay: Building a Load Path, Not Just a Lid
A plywood deck — a sheet of 3/4-inch plywood screwed across the cabinet tops, with the sink opening cut out — is often misunderstood. It is not there to make the countertop thicker. It spreads the slab's weight across the full run and ties neighbouring cabinets into one platform. Leave a solid bridge of plywood at the front and back of the cutout so the stone never rests on air, cut the opening slightly larger than the sink template with rounded corners, and screw the deck down before the stone arrives, checking it with a long level in both directions. Some fabricators skip the deck and set stone directly on rails — sound only when the rails are solid, level, and continuous. If yours are thin or interrupted, a deck is the safer choice for little more than a sheet of plywood and an hour's work, and seal its cut edges against moisture.
Holding the Sink Itself: Rails, Cradles, and Frames That Carry Hundreds of Pounds
The distinction most often missed: the countertop is not a sink support. An undermount sink glued and clipped beneath a stone slab hangs from adhesive, and adhesive creeps under sustained load. Sooner or later the seal fatigues, the sink drops a fraction, and the silicone joint opens. The sink needs its own structure, independent of the stone, so the sealant only has to stay waterproof — never load-bearing.
Three approaches cover nearly every kitchen. Clips and epoxy-bonded studs suit light stainless sinks, where adhesive does most of the work. Bolt-on steel rails cradle the sink from below and adjust even after the countertop is set. A site-built 2×4 cradle is the most adaptable option for odd sizes, though it eats storage. Install before templating, and load-test it with the real sink.
A farmhouse sink changes this part of the job, because it removes the front rail entirely. The sink must rest on a dedicated frame inside the cabinet — 2×4 ledgers or a manufacturer-approved frame, commonly rated for at least 300 pounds — never on the countertop edge or the clips in the box. Build the support before templating, and measure the actual sink, not the catalogue drawing.
A Weekend Sequence for Reinforcing a Sink Base Before Templating
If the cabinet is sound and the plumbing can stay put, the whole job fits into a weekend. Work with the old countertop off and the actual sink on site.
- Inspect and repair first: Empty the cabinet, check for water damage and soft floors, and repair anything soft before reinforcing around it.
- Anchor and level: Screw the cabinet to studs and neighbours, then level with shims under the base.
- Restore the front beam: Stiffen the opening with steel angle or a doubled rail, flush with the tops.
- Strengthen the box: Line thin sides and back with 3/4-inch plywood.
- Deck the tops: Screw down 3/4-inch plywood, cut the sink opening with rounded corners, and seal the edges.
- Support, verify, then template: Install the sink support, load-test it, re-check level, then call the fabricator.
That final check is the cheapest insurance in the project: a slab cut to fit an unlevel cabinet is a permanent problem.
Sink Base Reinforcement Slip-Ups That Show Up Months Later
Most reinforcement failures come from ordinary shortcuts whose consequences arrive slowly. Screwing into damaged particleboard is the classic example: the screw feels tight, yet six months of moisture and vibration later the threads have wallowed out and the support has dropped a few millimetres — enough to break a seal and start a leak. Decking over an unlevel cabinet is another; the stone bears on the high spot and cracks at the cutout. Sealing a deck so tightly against the sink rim that a leak has nowhere to show itself is a third: trapped water rots the deck quietly instead of announcing itself as a drip. The most expensive shortcut is reinforcing after templating, when the fabricator has already measured a cabinet about to change shape.
What a Sink Base Reinforcement Costs, and Where the Money Actually Goes
For a sound cabinet, this is among the cheapest insurance in a kitchen remodel: ordinary lumber-yard materials, a few hours for a DIYer or a half day for a carpenter. Costs below are estimates for one sink bay; prices vary by region and by how much repair the cabinet needs first.
Against a stone top costing several thousand dollars installed, reinforcement is a small fraction of the slab's price — the cheapest part of the project protects the most expensive part.
When a Sink Base Job Belongs to a Cabinetmaker, Not a Saturday DIYer
Most sink base reinforcement is within DIY reach, but some situations call for a cabinetmaker. If the floor or sides are compromised by rot or long-term leaks, rebuilding the box square and level is skilled work, and an out-of-square rebuild will haunt the stone installation. Moving the sink or cutting into a load-bearing wall is licensed-trade territory. Farmhouse conversions deserve professional eyes too, since removing the front rail is permanent. If stone is already installed and the sink is sagging, retrofitting support takes care — forcing a cradle into a loaded cabinet can crack the stone.
Final Thoughts: Is Your Sink Base Ready for Stone?
A sink base does not need to be rebuilt like a bridge. It needs three things restored in one bay: a stiff front beam, a continuous level platform for the stone, and an independent support for the sink. Check those three, fix what is missing before templating, and heavy stone becomes an ordinary load. Before the fabricator arrives, press-test the front rail, load-test the sink support, and check the run with a level one last time.
Kitchen Sink Base Reinforcement Questions Homeowners Ask Before the Fabricator Arrives
Does every sink base need reinforcement under granite or quartz?
Not every one, but most benefit from a check. A new plywood cabinet with a solid front rail and level tops may need only a sink support. Older, particleboard, or frameless cabinets, and any bay with water damage, almost always need more. Test level, stiffness, and anchoring rather than guessing from age.
Can a plywood deck alone carry a heavy stone countertop over a sink?
A deck spreads the load well, but it is no substitute for a stiff front rail or a sink support. A deck screwed to a flexing cabinet simply flexes with it. Both layers are needed.
How heavy is too heavy for a standard sink base cabinet?
No published rating exists for a standard cabinet, so installers work from the load path instead. 3-centimetre stone plus a filled cast iron or fireclay sink can put 300 pounds or more on one bay. If the cabinet fails the press test or shows water damage, treat that as too heavy until reinforced.
Should the sink hang from the countertop, or from the cabinet?
From the cabinet, through its own rails, cradle, or frame. Adhesive and clips can hold a light stainless sink for years, but heavy sinks need mechanical support independent of any glue bond. With its own structure, the silicone joint only has to stay waterproof.
Is it too late to reinforce a sink base after the stone is installed?
No, but options narrow. Bolt-on steel rail systems retrofit under an existing top, and a front rail stiffener can sometimes be added from inside. Full decking cannot be added without lifting the stone.
Does reinforcement change the templating or installation schedule?
Only in that it must come first. Work that changes height, level, or opening size after templating can invalidate the template, so finish all structural work, verify level, then schedule the fabricator. Done in that order, reinforcement adds days, not weeks.