Kitchen Cabinet Organization Techniques That Create Efficient Storage Systems for Modern Homes
A disorganized kitchen rarely lacks space. More often, it lacks a system. Plates sit far from the dishwasher, spices hide behind oil bottles, and the pan you need is always at the bottom of a heavy stack. You waste minutes every day moving things to reach other things, and you buy duplicates of items you already own but cannot find.
Good cabinet organization fixes that by giving every category a clear home based on how you actually cook. It does not require a full remodel. With a careful audit, a few well-chosen organizers, and a simple maintenance habit, standard cabinets can work like custom storage. Start with one weekend and a modest budget, and build the system zone by zone.
Auditing Your Cabinets and Decluttering First
Do not buy organizers before you know what you are storing. Empty one cabinet at a time so the kitchen stays usable, and lay everything on the table. You will likely find expired spices, chipped mugs, duplicate peelers, and appliances you have not used in a year. Organizing clutter only hides it better.
Sort each item into four groups: use weekly, use monthly, use rarely, and let go. Be honest about rarely used items. A bread machine used twice a year may earn a high shelf, while a second slow cooker can be donated. Check dates on spices, baking supplies, and medicines often kept above the stove, where heat shortens their life.
- Measure before you buy: Record the inside width, depth, and height of every cabinet and drawer, including the space lost to hinges and pipes under the sink.
- Count what remains: Note how many plates, glasses, pans, and food containers must fit, so organizers are sized for real numbers, not guesses.
- Photograph problem areas: A quick photo of the worst cabinet helps you plan and gives you a satisfying before-and-after comparison later.
Clean the empty shelves with warm water and a mild cleaner, let them dry fully, and add washable liner if the surface is worn. This reset takes two to three hours for an average kitchen and makes every later decision easier.
Zone-Based Cabinet Organization
Professional organizers divide kitchens into zones that mirror daily tasks. When storage follows the task, you stop crossing the room with dripping utensils or hot pans. The exact layout depends on your kitchen, but five zones cover most homes.
- Prep zone: Near the main work surface, keep knives, cutting boards, mixing bowls, measuring cups, and everyday spices within one step.
- Cooking zone: Around the stove, store pots, pans, spatulas, wooden spoons, cooking oils, and oven mitts so nothing requires a trip mid-recipe.
- Baking zone: Group flour, sugar, baking pans, parchment, and the stand mixer attachments together, ideally near the widest counter.
- Dishes and serving zone: Place plates, bowls, and glasses in the cabinets closest to the dishwasher or sink, so unloading takes minutes, not laps.
- Coffee and breakfast zone: Keep mugs, coffee, filters, cereal, and the toaster supplies in one cabinet and counter stretch for faster mornings.
Within each zone, follow the prime-real-estate rule: items used daily belong between knee and shoulder height, monthly items go higher or lower, and rarely used pieces take the hardest corners. Move one zone at a time, live with it for a week, and adjust before tackling the next.
Pull-Outs, Drawers, and Interior Systems That Do the Heavy Lifting
Deep base cabinets are where items go to disappear. Pull-out systems bring the back of the cabinet to you, which is especially valuable as lifting and bending get harder. A two-tier pull-out shelf costs about $40 to $90 per cabinet and installs with four to eight screws in under 30 minutes. Full-extension drawer slides rated for 75 to 100 pounds handle cast iron without sagging.
If you are replacing or refacing cabinets, choose drawers over doors for base units wherever possible. One deep drawer holds as much as a cabinet and shows everything at once. In existing cabinets, add roll-out trays, vertical dividers for baking sheets and trays ($15 to $30), and a pull-out trash and recycling unit ($60 to $150) near the sink to keep waste off the floor and out of sight.
Inside drawers, use adjustable dividers rather than fixed trays. A bamboo utensil divider at $20 to $35 expands to fit, separates everyday cutlery from serving pieces, and leaves room for odd tools. Add a shallow drawer near the stove for spices lying flat, labels up, where you can read every jar in one glance.
Pantry and Corner Cabinet Solutions
Whether your pantry is a tall cabinet, a closet, or two deep shelves, the rules are the same: group by category, keep labels facing forward, and never stack food more than two items deep. Decant flour, rice, pasta, and cereal into clear, airtight containers ($25 to $45 for a basic set). You will see quantities at a glance, keep food fresher, and eliminate half-empty bags collapsing into each other.
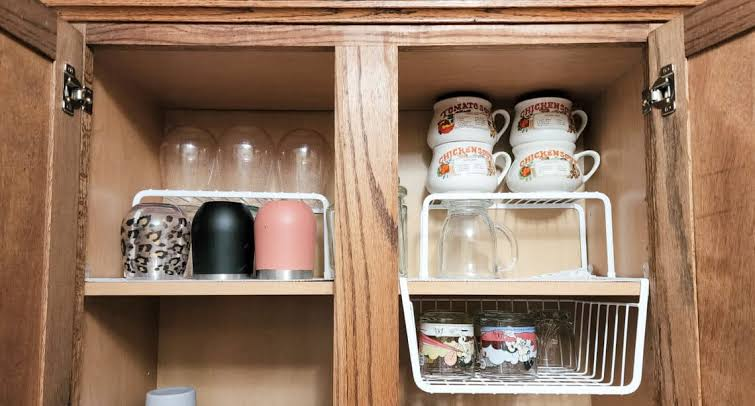
Use shelf risers and small bins to create levels. Canned goods belong on a tiered riser ($12 to $20) so back rows stay visible. Snacks, packets, and kids’ items do well in open bins you can pull out like drawers. Put heavy items such as drinks and bulk bags on the lowest shelf, and reserve eye level for everyday staples.
Blind corner cabinets need hardware that moves. A kidney-shaped lazy Susan ($50 to $120) suits light items, while a pull-out corner system or swing-out shelves ($150 to $350) handle heavier pots and small appliances far better. If new hardware is not in the budget, store only large, rarely used items there in a single labeled bin you can slide out whole.
Spice and Small-Item Organization
Spices fail in two ways: there are too many, and none are visible. Limit the working collection to the 20 to 25 spices you actually use, store the rest of the specialty jars together elsewhere, and buy small quantities of the ones you use slowly. Ground spices lose strength in six to twelve months, so date the bottom of each jar with a marker when you open it.
Choose one system and commit to it. A tiered cabinet riser works if you cook from the cabinet, a drawer insert works best beside the stove, and uniform jars with printed labels prevent the visual chaos that makes a full shelf feel empty of the one thing you need. Avoid storing spices above the stove, where steam and heat fade flavor fastest.
Apply the same thinking to small items generally. Use small, clear containers for batteries, twist ties, and appliance parts, each labeled and kept in one utility drawer. Junk drawers shrink when everything inside has a divider, a label, and a reason to be in the kitchen at all.
Pots, Pans, and Lid Storage Without the Avalanche
Stacking every pan in one pile damages nonstick coatings, makes a racket, and guarantees the pan you want is at the bottom. A deep drawer with an adjustable peg system ($30 to $60) keeps pots separated and visible. In a cabinet, a vertical file-style rack ($18 to $35) stores frying pans and lids on their sides like books, so you slide out one without moving the rest.
Lids deserve their own solution. Mount a lid rack inside a cabinet door ($12 to $25), use a dedicated lid drawer under the cookware, or store each lid on its own pot only if space is plentiful. Hang everyday pans from a wall rail or ceiling rack if cabinets are tight, but keep heavy cast iron low and close to the stove.
- Protect surfaces: Place felt pads or paper liners between stacked pans you cannot store vertically, and replace them when they wear thin.
- Keep sets honest: If you have not used a pan in a year, the full matching set is not a reason to keep it. Space beats completeness.
Maintaining the System So It Lasts
No system survives without a small reset habit. Spend five minutes while the kettle boils or dinner cooks returning strays to their zones. Involve the household: a system only works if everyone can follow it, so labels and logical places matter more than perfect styling.
- Weekly: Wipe one shelf, check the fridge-adjacent cabinets for expired items, and return borrowed items to their zones.
- Monthly: Review one drawer or cabinet, remove anything that crept in without a purpose, and adjust dividers if needs changed.
- Seasonally: Repeat the mini-audit, check spice dates, donate duplicates, and note any organizer that is failing before it breaks.
Follow a one-in, one-out rule for mugs, containers, and gadgets. When a new item arrives, the item it replaces leaves the same week. That single habit prevents the slow refill that undoes most organizing projects within a year.
Final Thoughts
An efficient kitchen is not about matching containers or a showroom finish. It is about reaching what you need, first try, without moving three other things. Audit honestly, build zones around how you cook, add pull-outs where depth defeats you, and protect the result with five-minute resets. Start with the cabinet you open most often. One working zone will convince you to finish the rest.
Frequently Asked Questions
How much does it cost to organize kitchen cabinets properly?
A solid reorganization costs $100 to $300 using risers, bins, dividers, and one or two pull-outs. Drawer conversions and corner hardware can raise the total to $500 or more. Spend first on the cooking and dishes zones, where daily use repays the cost fastest.
What should I do first in a very small kitchen?
Audit ruthlessly, then use vertical space. Add door racks, a tiered spice riser, and hooks under shelves for mugs. In small kitchens, removing ten unused items helps more than any single organizer you can buy.
Can renters organize cabinets without drilling or permanent changes?
Yes. Use tension rods for lids, freestanding risers, over-door racks, removable adhesive hooks, and bins that slide like drawers. Most pull-out trays use a few small screws, so check your lease or choose no-drill versions where needed.
How do I organize deep cabinets where things get lost at the back?
Stop storing loose items at the back. Use long bins or roll-out trays that bring contents forward, group each bin by task, and label the front. If you cannot see it without kneeling and unloading, it needs a movable container.
How often should I reorganize my kitchen cabinets?
Do a light reset weekly, review one cabinet monthly, and repeat a full audit once or twice a year. If you follow one-in, one-out, the yearly audit becomes a quick edit rather than another weekend project.