How to Improve Exterior Wall Drainage Behind Stone and Brick Veneer Installations
Stone and brick veneer look solid and almost waterproof from the street, but both materials are porous. Mortar joints open slightly with temperature and moisture, and wind-driven rain is pushed through hairline cracks and around windows and doors. Water getting behind veneer is therefore expected, not rare, and the wall only stays healthy when that water has a clear way back out.
The short answer is this: improve drainage by giving water a continuous path down, across flashing, and out through open weep holes, while keeping that path free of mortar, insulation, and debris. That means a sound water-resistive barrier, a clear air gap or drainage mat, correctly lapped flashing at the base and above every opening, weep holes spaced about 24 to 33 inches apart, and a weep screed that is never buried or sealed. On an existing home, most gains come from clearing the exits and fixing the few places where water concentrates.
Why Water Gets Behind Veneer Even When the Face Looks Sound
A veneer wall is a rainscreen, not a waterproof shell. The outer layer takes the weather, while the real defence sits behind it: the water-resistive barrier, the drainage space, the flashing, and the weep holes. When those inner layers work, the small amount of water that passes the veneer runs down and leaves at the base without soaking the sheathing for long.
- Judge a veneer wall by how well it drains, not by how sealed it looks.
- Expect water entry at joints, penetrations, and roof junctions, and give each a flashing detail that sends water outward.
How a Veneer Drainage System Is Supposed to Work
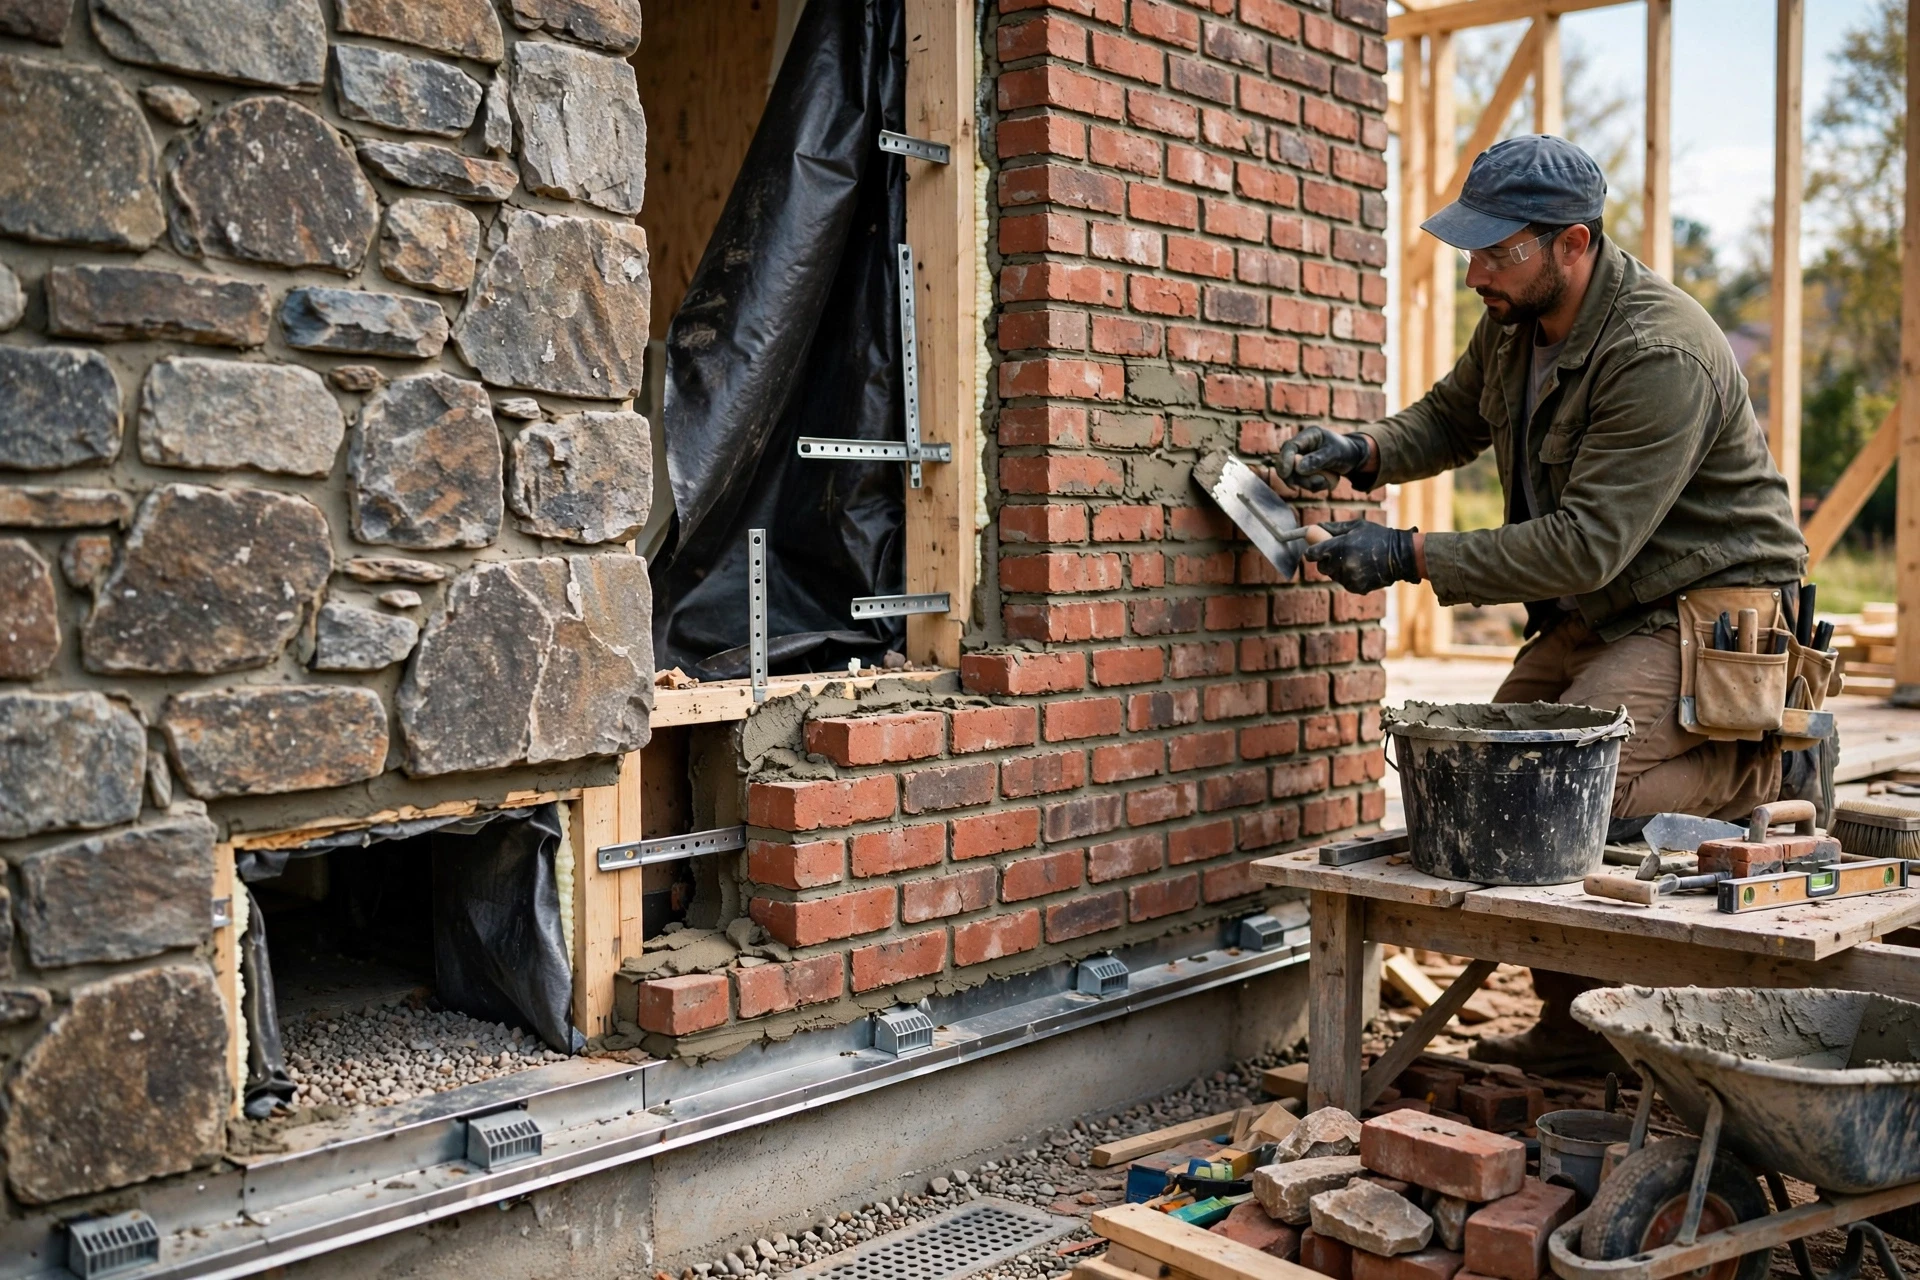
A healthy veneer wall works as a chain of four parts. First, the water-resistive barrier, or WRB, covers the backup wall and sheds water downward. Second, a drainage space separates the veneer from that barrier so water can fall freely. Third, flashing collects water at the base and above openings and directs it outward. Fourth, weep holes and a weep screed let that water escape. Remove any one part and the others cannot compensate for long.
| Part of the system | What it does | What failure looks like |
|---|---|---|
| Water-resistive barrier | Sheds water down the backup wall | Torn barrier lets water reach wood |
| Drainage space or mat | Gives water a free fall path | Mortar bridging holds water in place |
| Through-wall flashing | Collects water and directs it out | Missing flashing lets water pond inside |
| Weep holes and weep screed | Let water and moist air exit | Blocked weeps trap water in the cavity |
Reading the Warning Signs of Trapped Water Behind Stone and Brick Veneer
Walk the wall after rain, and again on a dry day. After rain, look for water weeping from joints long after the face has dried, damp patches lingering at the base, and staining below a window sill or roof junction. On a dry day, look for white efflorescence, dark staining, algae near the base, rust streaks, and mortar that is soft or missing. Inside, the clues are musty smells, damp plaster, peeling paint, and mould in corners that never dry out.
A few simple checks add evidence without opening the wall. Tap suspect stones gently: a solid stone sounds dull and firm, while a delaminated one sounds hollow. Press mortar joints with a screwdriver tip; sound mortar resists, while decayed mortar crumbles. Check the ground line, because soil or paving that covers the weep screed hides the drainage exit. Patterns matter most: damage below a window points to failed head flashing, damage in a band along the base points to blocked weeps, and damage below a roof junction points to missing kick-out flashing.
- Photograph each damp patch and hollow-sounding stone, with the date and weather, so you can tell whether a repair is working.
- Do not seal the face of a damp veneer wall with a waterproof coating until drainage is fixed, or you may trap water inside.
Clearing Blocked Weep Holes and Restoring the Exit Path at the Base
Clearing the exits is the cheapest and most effective first step on most existing veneer walls. In brick veneer, weep holes are open head joints, slots, or plastic vents in the lowest course above the flashing. In adhered stone veneer, the exit is usually the weep screed, a slotted metal trim at the bottom of the wall. Clear soil, mulch, leaves, and paving that bury them, and restore a gap of at least 4 inches, preferably 6 inches, between finished grade and the bottom of the veneer.
Clean each weep hole gently. Pick out loose mortar, paint, and debris with a thin wooden or plastic tool, and flush the opening with a low-pressure garden hose rather than a pressure washer, which can drive water deeper into the cavity. Do not force a stiff wire deep into the cavity, or you may puncture the WRB. Where weeps were filled with mortar or caulk, reopen them carefully with a small masonry bit, keeping the opening the width of a head joint. If the wall has no weep holes, do not drill a row on guesswork: the flashing position must be found first, because a weep drilled below the flashing drains nothing.
Upgrading Flashing, Kick-Out Details, and the Drainage Plane on an Existing Wall
Flashing is the part most often missing or wrong on older veneer walls, and it repays careful repair most directly. Base flashing should sit under the lowest course, extend through the veneer, and slope outward so water runs off it. End dams stop water running sideways into the framing, and laps should run shingle-style. Where base flashing has failed, a specialist can retrofit new flashing by removing the bottom courses, installing a self-adhered membrane and metal flashing, and rebuilding with open weeps.
Creating a Reliable Air Gap Behind Adhered Stone Veneer
Adhered stone veneer fails differently from anchored brick, because the stone is bonded to the wall and there is no natural cavity. A mortar bed pressed directly against house wrap can trap moisture for days after rain. The most reliable improvement on a new installation is a three-dimensional drainage mat, a dimpled membrane, or a self-furring lath that holds a continuous gap between the mortar and the WRB. The mat should run the full height of the wall and terminate at a weep screed at the base.
The gap does not need to be large, often around a quarter of an inch is enough, but it must be continuous: a mat that is crushed, bridged by mortar, or stopped short of the base does not drain. On an existing adhered-stone wall, you cannot create a full drainage mat without removing the stone, so the practical work is to protect the wall from water entry, keep the base exit open, and improve drying. Where a section has delaminated, remove it, inspect the substrate, and rebuild it with a drainage mat and a proper weep screed rather than bonding new stone onto the old, failed detail.
Keeping Mortar, Insulation, and Ties From Bridging the Cavity in Brick Veneer
In anchored brick veneer, the cavity is the drainage system, and anything that bridges it defeats the system. Mortar droppings are the most common bridge. As each course is laid, excess mortar falls into the cavity and, if it is not caught, builds up into dams that hold water against the backup wall. Mortar-collection devices, mesh nets, or a drainage mat at the base catch those droppings and keep a path open. They must fill the full width of the cavity to work; a device that leaves a gap at the sides simply moves the blockage to the edges.
Insulation needs the same discipline. Rigid insulation reduces the clear air space, and if it fills the cavity completely, the drainage space disappears. Keep at least 1 inch of clear air space between the face of the insulation and the back of the brick. Boards should be fixed tightly to the backup wall so they do not bow into the cavity. Wall ties should slope slightly outward so water drips toward the veneer, and corrosion-resistant ties last far longer than plain steel in a damp cavity. During any opening-up work, check a sample of ties for corrosion and replace failed ones.
Seasonal Care, Repair Costs, and When Veneer Trouble Needs a Specialist
Veneer drainage needs a short seasonal routine. In autumn, clear gutters, check kick-out flashing, and keep leaves from piling against the base of veneer walls. In winter, watch for ice in weep holes and repeated freeze-thaw at the base, a sign water is lingering there. In spring, walk the wall after the first heavy rain, check that weeps are open and grade is still clear, and look for new efflorescence. In summer, repair sealant while the wall is dry, and repoint small areas of failed mortar before autumn rain returns.
Costs vary widely by region and access, so treat these as broad planning ranges. Clearing weeps, fitting vents, and restoring grade are usually the lowest-cost measures, often a modest sum for a day of work. Replacing sealant and fitting kick-out flashing sit in a similar range. Retrofitting base flashing or rebuilding a delaminated section costs more, because veneer must be removed and reinstated. A full-wall rebuild with a new WRB is the most expensive option and is usually justified only when the substrate is damaged. Spend in the order that restores function first, get at least two detailed quotations, and ask for photographs of the WRB and flashing before the veneer is closed up.
Call a specialist promptly if the veneer is bowing, leaning, or cracking in a stepped pattern, if units are falling off, or if interior damp is spreading and timber feels soft. Check whether a permit is required, confirm the contractor is licensed and insured, and agree in writing what drainage detail will be built. If a contractor proposes sealing the face alone, seek a second opinion.
Final Thoughts: Keeping Veneer Walls Dry for Decades
A veneer wall that drains well can last for decades with little more than seasonal care: clear weep holes, sound flashing, a free drainage path, and grade kept below the base of the wall. Start this week: walk the wall after rain, find the weep holes and the weep screed, and make sure they are open and clear of soil. If the wall shows bowing, falling units, or spreading interior damp, bring in a specialist before the damage spreads.
Exterior Wall Drainage Behind Stone and Brick Veneer FAQs
How can I tell if water is trapped behind my stone or brick veneer?
Look for efflorescence, damp patches that linger after rain, crumbling mortar, hollow-sounding stones, and musty smells inside. A single stain may be cosmetic, but a pattern of damp and hollow units points to trapped water.
Do all brick veneer walls need weep holes?
Yes, in practice every anchored brick veneer wall needs weep holes at the base and above every flashing line. Widely used practice places them no more than 24 to 33 inches apart, above the flashing.
What is the minimum air gap behind brick veneer?
The widely cited minimum is 1 inch of clear air space between the back of the brick and the backup wall or insulation, with 2 inches recommended. The gap must stay clear for the full height of the wall.
Can I add drainage behind adhered stone veneer without removing the stone?
Not fully. A drainage mat can only be installed properly when the stone is off the wall, so on an existing wall clear the weep screed, repair flashing, and control grade. Rebuild any delaminated section with a drainage mat.
Should I seal the outside of stone or brick veneer to stop water getting in?
Sealing the face alone is rarely the answer and can trap water already in the cavity. Sealers can help on very porous stone in an exposed location, but only after the drainage path, flashing, and weeps are working.
Why is water coming out of the weep holes after rain, and is that a problem?
Water leaving through weep holes after rain usually means the system is working. A brief trickle that stops as the wall dries is normal; water running for days suggests the cavity is holding too much water.
How often should I check veneer drainage?
Check the base, weep holes, and grade at least once a year, ideally in spring, and again after any major storm. Clear gutters in autumn and check kick-out flashing where a roof meets a veneer wall.
What does it cost to fix drainage behind veneer?
Clearing weeps and restoring grade are usually low-cost measures, while retrofitting flashing or rebuilding a section costs more. A full-wall rebuild is the most expensive option and is usually reserved for damaged substrates.